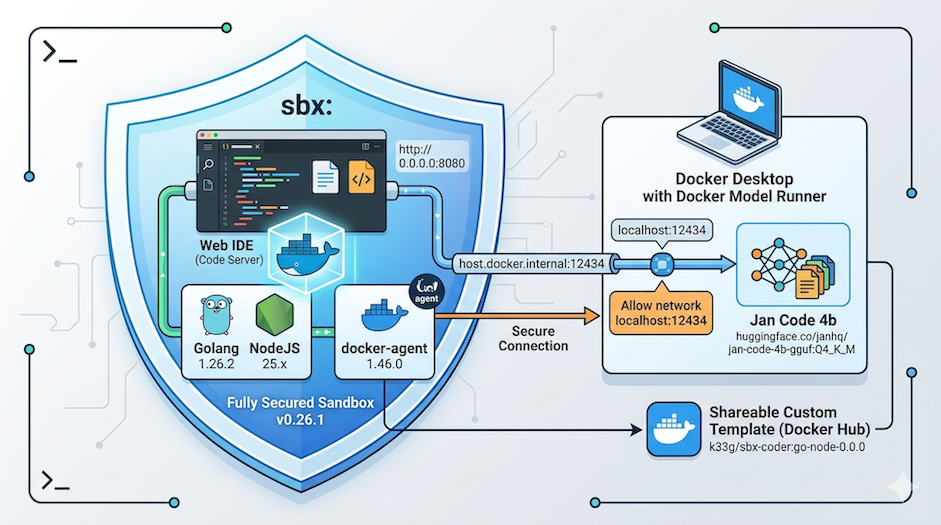
Embedding a Web IDE and Docker Agent into sbx, a fully secured sandbox
To provide a ready-to-use secure development environment
Today my goal is fourfold:
- I want to share the execution environment of my
sbxsandbox with my IDE, and to do that I’m going to deploy a Web IDE insidesbx. I’ll be using: Code Server. - I want my sandbox to use the latest version of
docker-agent(1.46.0) because the latest update ofdocker-agentbrings improvements that make it easier to work with small local language models. And the latest version ofsbx(v0.26.1) doesn’t ship the latest version ofdocker-agent. - And of course, I want to use Docker Model Runner to run local LLMs.
- It has to be reproducible (easily) and shareable: I want to be able to redistribute my secure development environment.
Prerequisites
If you’ve read my previous articles, you already have most of what you need to follow this one and can skip this section. But I’ll do a “quick” recap of what you’ll need.
Required software
- Docker Desktop (or Docker Engine only if you’re on Linux (*))
- Docker Model Runner
sbxtmux(I’ll need to launch the sandbox and leave it running in the background).
(*) To install Docker Model Runner on Linux, read Install and Run Docker Model Runner on Linux
I’ve tested everything I’ll explain here on a MacBook Air M4 32GB and a MacBook Pro M2 32GB. But all the tools proposed also exist for Windows and Linux with the exception of tmux. But the tmux part isn’t strictly required, it’s just a quality-of-life thing. I don’t have a Windows machine on hand to test.
sbx and Docker Model Runner
Take a look at this article Using docker-agent with Docker Model Runner and sbx. Even though I provide all the necessary guidance in this article, it can help with understanding (and will explain how to install sbx).
Download a local language model
In future articles, where I want to explain how a very small local language model can make our developer life easier, I’ll reuse the development environment we’re building today. My choice this time will be Jan Code (4b): https://huggingface.co/janhq/Jan-code-4b-gguf. To download it, use the following command:
docker model pull huggingface.co/janhq/jan-code-4b-gguf:Q4_K_M
Required hardware
To be able to use a local LLM, you need a GPU and a decent amount of RAM. I’m using a MacBook Air M4 with 32GB of RAM, and it runs comfortably. I’d say 16GB of RAM should still work fine.
If you don’t have a GPU, you have 2 options:
docker-agentcan use external AI endpoints: Model Providers- Use a very very very small model like Qwen2.5-0.5B or Qwen3.5-0.8B which can run on CPU (but forget about the “mini code agent” part).
… Let’s go! 🚀
sbx and Custom templates
Inside an sbx sandbox, you can install whatever you want, but every time you recreate a sandbox you have to reinstall all the tools you need (or why not ask the agent to do it, but honestly I don’t like doing that 🤣). So that’s where Custom templates come in. Custom templates are reusable sandbox images that extend one of the built-in agent environments (Claude Code, Gemini, docker-agent…) to which you can add your own tools.
And the cherry on top: there’s a Shell Sandbox, which is sbx without an agent. That’s exactly what we need for our use case: a secure development environment with a Web IDE and docker-agent pre-installed. It’s just a simple Dockerfile like this:
FROM docker/sandbox-templates:shell

USER root

RUN <<EOF
apt-get update
apt-get install -y wget curl build-essential xz-utils software-properties-common
rm -rf /var/lib/apt/lists/*
EOF

USER agent
📘 Custom Environments documentation: https://docs.docker.com/ai/sandboxes/agents/custom-environments/
Adding docker-agent to our Custom template
I’m going to use the Multi Stage Builds approach to add docker-agent to my Custom template:
FROM docker/docker-agent:1.46.0 AS coding-agent

FROM --platform=$BUILDPLATFORM docker/sandbox-templates:shell

USER root

RUN <<EOF
apt-get update
apt-get install -y wget curl build-essential xz-utils software-properties-common
rm -rf /var/lib/apt/lists/*
EOF

# ------------------------------------
# Install docker-agent
# ------------------------------------
COPY --from=coding-agent /docker-agent /usr/local/bin/docker-agent

USER agent
The complete Custom template
For my needs, I need to install:
docker-agent- Golang
1.26.2 - NodeJS
25.x - And of course, code-server for the Web IDE.
Here is the complete Dockerfile I use for my Custom template:
FROM docker/docker-agent:1.46.0 AS coding-agent

FROM --platform=$BUILDPLATFORM docker/sandbox-templates:shell

LABEL maintainer="@k33g_org"
ARG TARGETOS
ARG TARGETARCH

ARG USER_NAME=agent

ARG GO_VERSION=1.26.2
ARG NODE_MAJOR=25

ENV TERM=xterm-256color
ENV COLORTERM=truecolor

ENV LANG=en_US.UTF-8
ENV LANGUAGE=en_US.UTF-8
ENV LC_COLLATE=C
ENV LC_CTYPE=en_US.UTF-8

USER root

RUN <<EOF
apt-get update
apt-get install -y wget curl build-essential xz-utils software-properties-common
rm -rf /var/lib/apt/lists/*
EOF

# ------------------------------------
# Install Go
# ------------------------------------
RUN --mount=type=cache,target=/tmp <<EOF
GOARCH=${TARGETARCH} && \
wget https://golang.org/dl/go${GO_VERSION}.linux-${GOARCH}.tar.gz -O /tmp/go.tar.gz && \
tar -xvf /tmp/go.tar.gz -C /tmp && \
mv /tmp/go /usr/local && \
rm /tmp/go.tar.gz
EOF

# ------------------------------------
# Set Environment Variables for Go
# ------------------------------------
ENV GOROOT="/usr/local/go"
ENV GOPATH="/home/${USER_NAME}/go"
ENV PATH="${GOPATH}/bin:/usr/local/go/bin:${PATH}"

RUN <<EOF
go version
go install -v golang.org/x/tools/gopls@latest
go install -v github.com/ramya-rao-a/go-outline@latest
go install -v github.com/stamblerre/gocode@v1.0.0
go install -v github.com/mgechev/revive@v1.3.2
EOF

# ------------------------------------
# Install NodeJS
# ------------------------------------
ARG NODE_MAJOR
RUN <<EOF
apt-get update && apt-get install -y ca-certificates curl gnupg
curl -fsSL https://deb.nodesource.com/setup_${NODE_MAJOR}.x | bash -
apt-get install -y nodejs
EOF

# ------------------------------------
# Install code-server
# ------------------------------------
RUN curl -fsSL https://code-server.dev/install.sh | sh

# code-server config: no auth, bind on all interfaces
RUN mkdir -p /home/agent/.config/code-server
COPY config.yaml /home/agent/.config/code-server/config.yaml
RUN chown -R agent:agent /home/agent/.config

# Auto-start code-server on login shell (idempotent: only starts if not running)
COPY start-code-server.sh /etc/profile.d/start-code-server.sh
RUN chmod +x /etc/profile.d/start-code-server.sh

# ------------------------------------
# Install docker-agent
# ------------------------------------
COPY --from=coding-agent /docker-agent /usr/local/bin/docker-agent

# Switch to the regular user
USER ${USER_NAME}

# ------------------------------------
# Install OhMyBash
# ------------------------------------
RUN <<EOF
bash -c "$(curl -fsSL https://raw.githubusercontent.com/ohmybash/oh-my-bash/master/tools/install.sh)"
EOF

EXPOSE 8080
It can certainly be improved, but it does the job. I’m open to any suggestions to make it better.
To get code-server working, we’ll need 2 additional files: config.yaml and start-code-server.sh. Here is their content:
config.yaml:
bind-addr: 0.0.0.0:8080
auth: none
cert: false
start-code-server.sh:
#!/bin/bash
# Auto-start code-server on login shell
# Placed in /etc/profile.d/ so it runs for every login shell

if ! pgrep -x "code-server" > /dev/null 2>&1; then
    # Use the project directory mounted by sbx, falling back to $HOME
    WORKSPACE="${SBX_PROJECT_DIR:-${PWD:-$HOME}}"
    echo "[code-server] Starting on http://0.0.0.0:8080 (workspace: $WORKSPACE)"
    code-server --auth none --bind-addr 0.0.0.0:8080 "$WORKSPACE" \
        > /tmp/code-server.log 2>&1 &
    echo "[code-server] PID $! — logs: /tmp/code-server.log"
fi
Building and publishing our Custom Environment image
You only need a simple docker build:
docker build -t k33g/sbx-coder:go-node-0.0.0 --push .
k33gis my Docker Hub username.
Launching and using our new sandbox
Configuring docker-agent
Now that our Custom Environment image is built and published, we can use it to create an sbx sandbox.
First, in a folder of your choice, create a Dockerfile along with a configuration file for docker-agent (config.yaml):
agents:
  root:
    model: brain
    description: Bob
    instruction: |
      Your name is Bob. You are coding expert.

    toolsets:
      - type: shell
      - type: filesystem

models:
  brain:
    provider: dmr
    model: huggingface.co/janhq/jan-code-4b-gguf:Q4_K_M
    base_url: http://host.docker.internal:12434/engines/v1

    temperature: 0.0
    top_p: 0.9
    presence_penalty: 0.0

    provider_opts:
      runtime_flags: ["--top_k=40","--min_p=0.05","--repetition_penalty=1.1"]
We now have everything we need to launch our sandbox.
Launching the sbx sandbox
First we need to add a policy to allow the sandbox to communicate with Docker Model Runner, i.e. to reach localhost:12434 (and thus from inside the sandbox to reach host.docker.internal:12434):
sbx policy allow network localhost:12434
Then we can create a sandbox instance (without starting it) from our custom template with the following command:
sbx create --template docker.io/k33g/sbx-coder:go-node-0.0.0 shell .
⏳ Creating the sandbox may take a moment on the first launch.
Then we need to publish port 8080 of the sandbox to be able to access code-server from our browser:
sbx ports shell-demo --publish 8080:8080/tcp
✋ Note:
shell-demois the sandbox name: <kind_of_sandbox>-<sandbox_name>.
This means you can spin up other sandboxes, in other folders, with the same template, and publish their port 8080 on a different port of your host machine to work on multiple projects simultaneously.
That’s where tmux comes in: it lets us launch the sandbox and leave it running in the background while we do other things in our terminal:
tmux new -d -s demo 'sbx run shell-demo'
- ✋ Note:
demois thetmuxsession name, you can give it any name you want.- ✋ Note: if you don’t have
tmux, you can still launch the sandbox withsbx run shell-demo, but you’ll need to keep that terminal open for the sandbox to keep running.
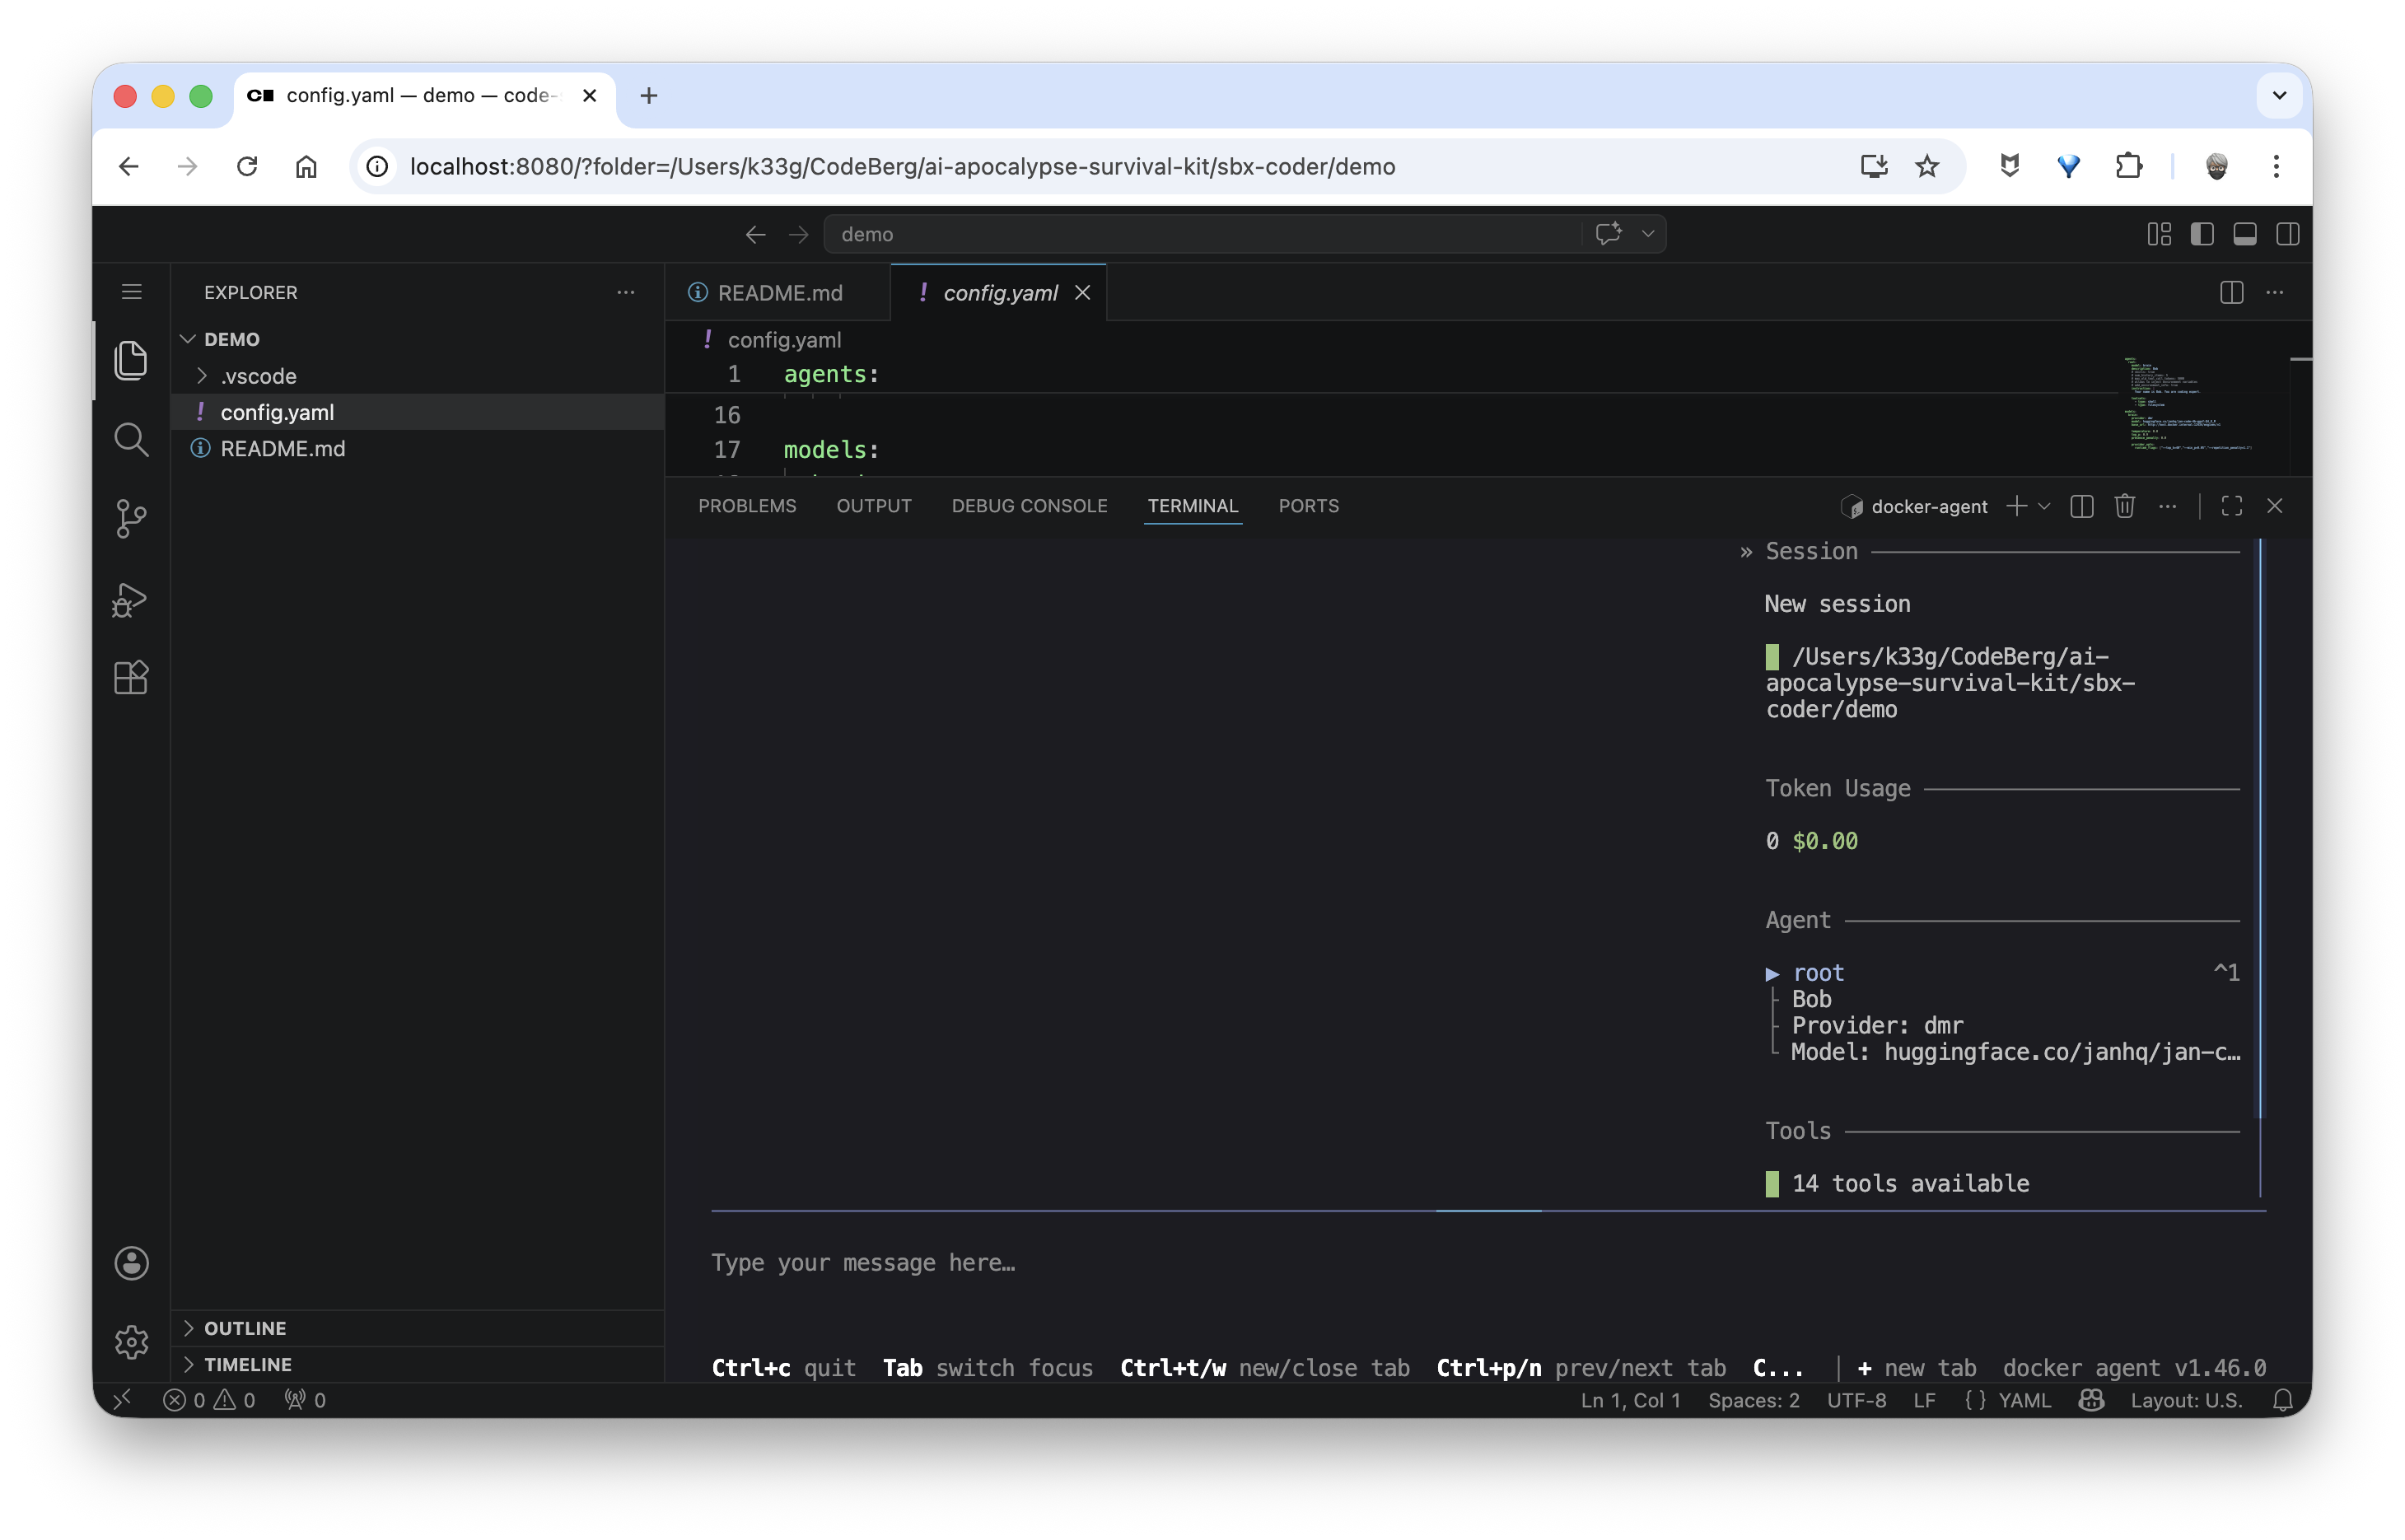
All that’s left is to go to http://localhost:8080 to access your Web IDE:

In an integrated terminal in code-server, you can launch docker-agent with the following command:
docker-agent run config.yaml
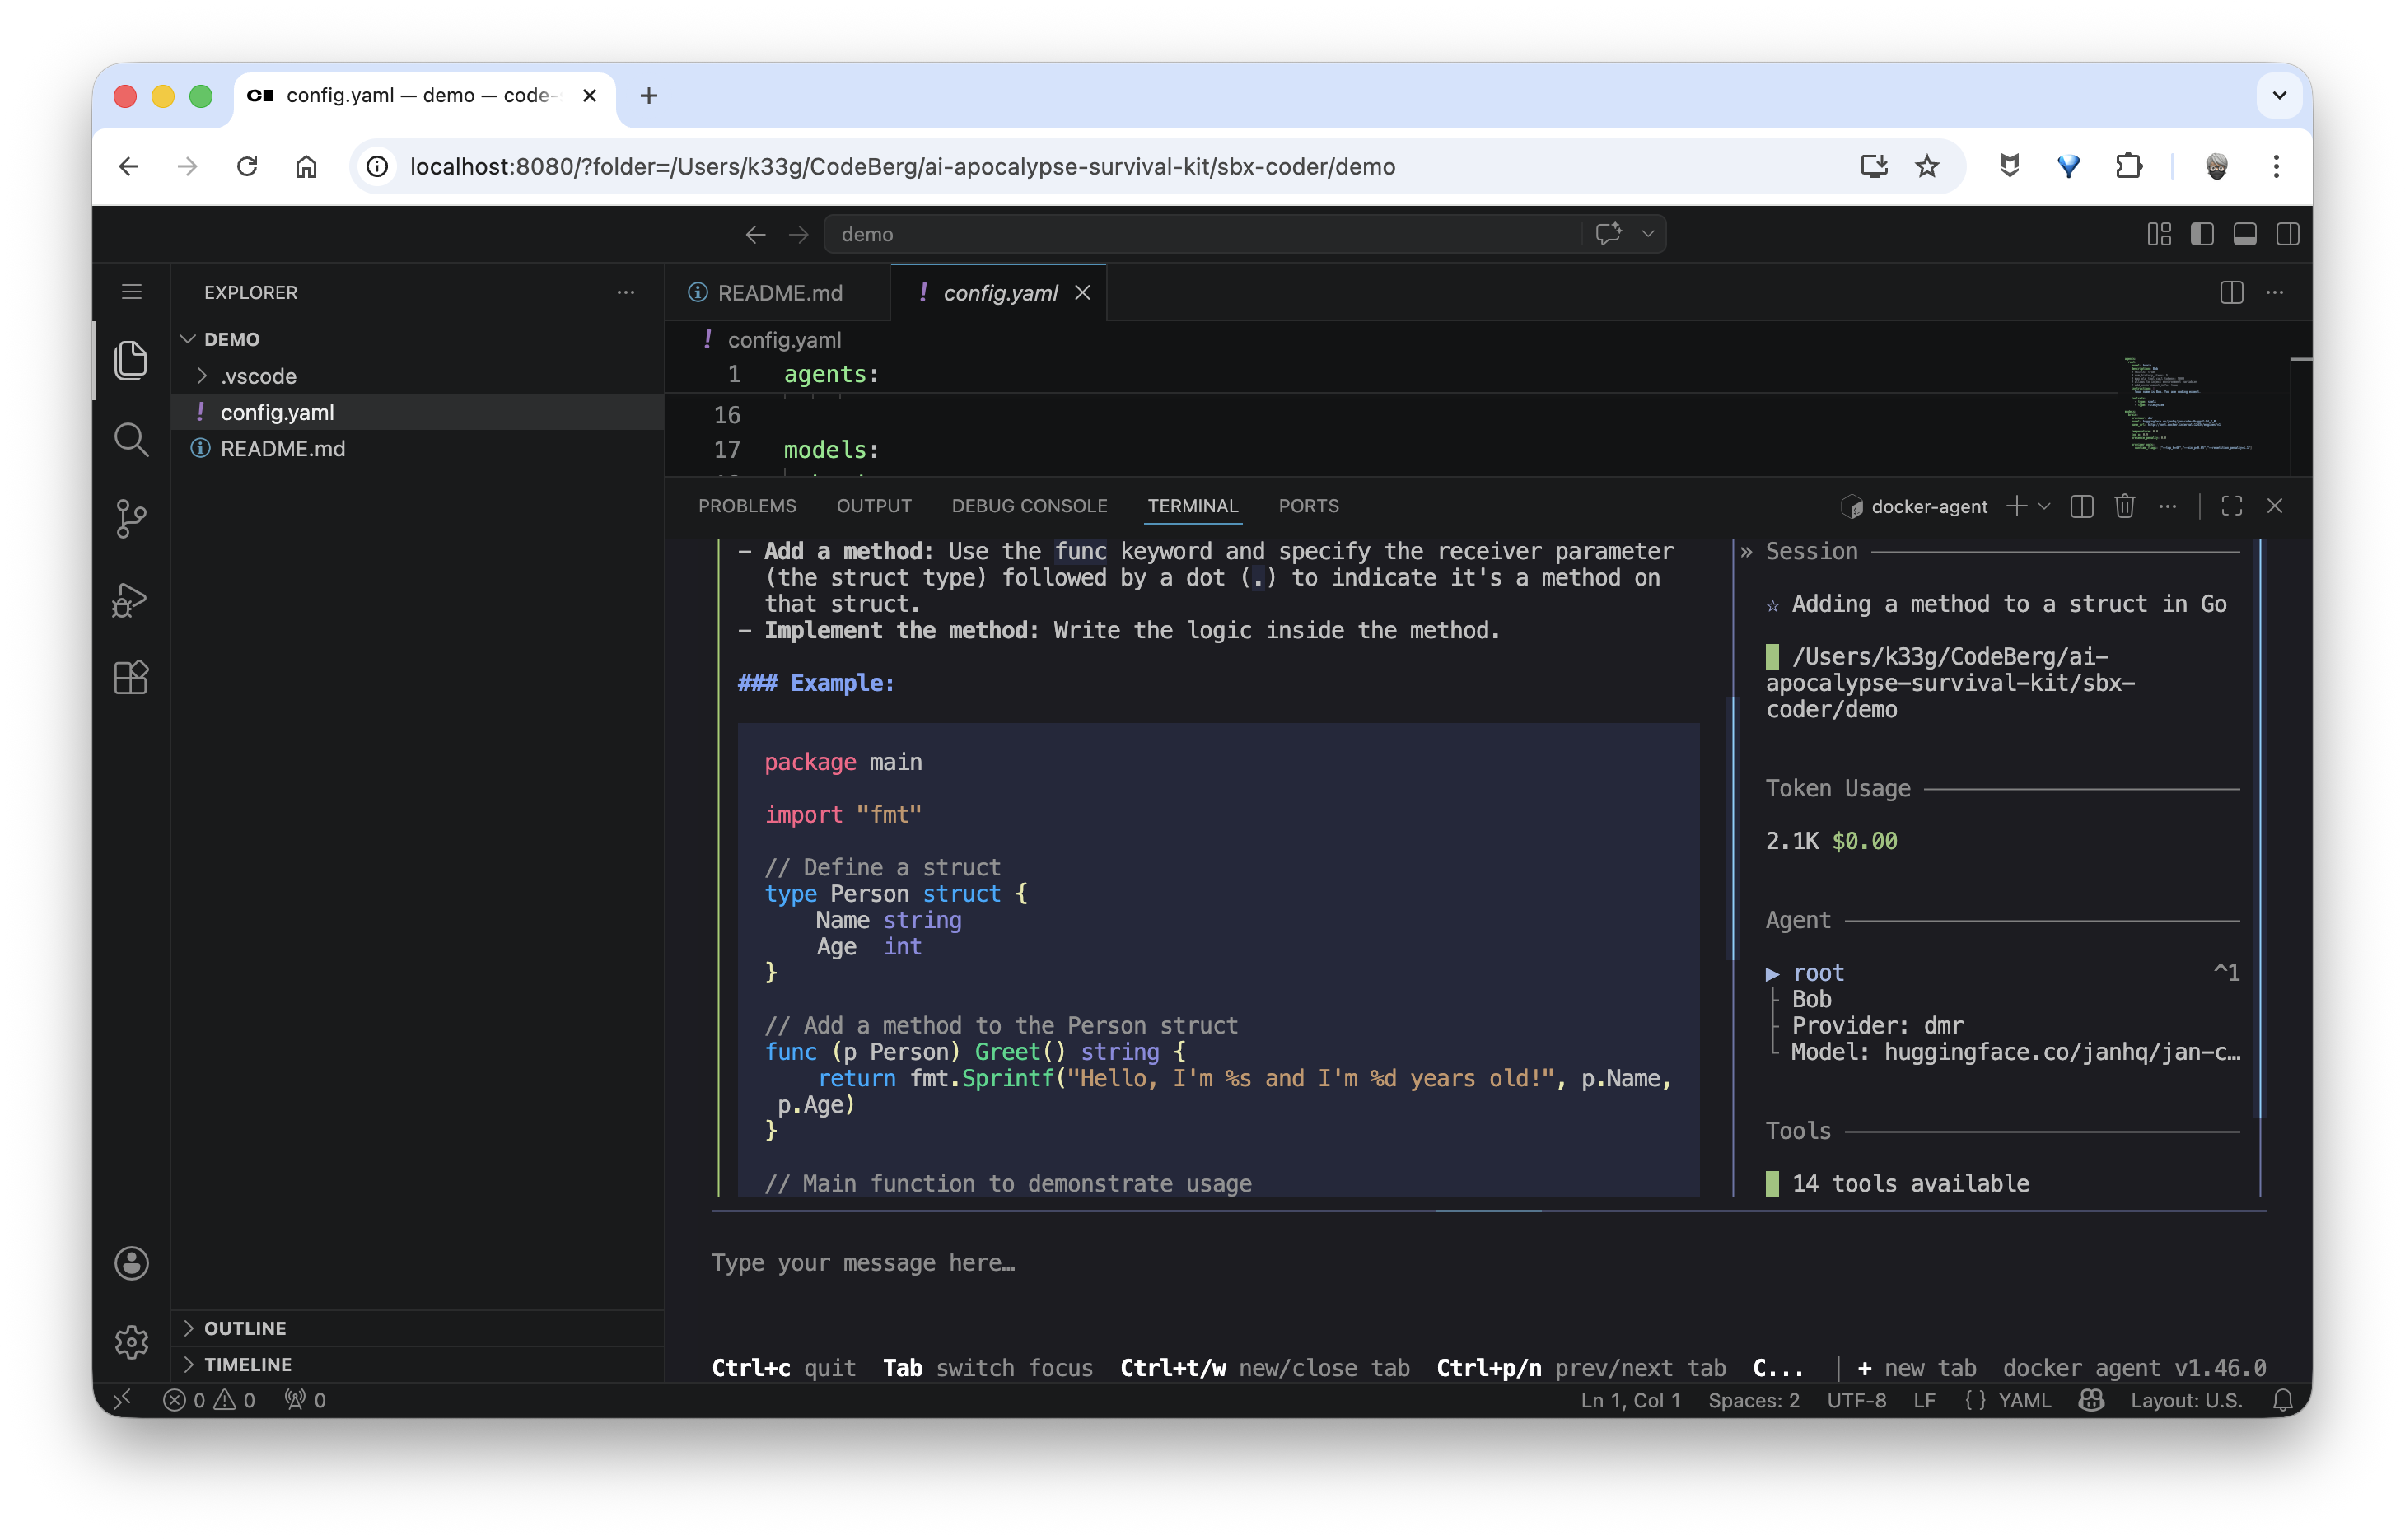
And start chatting with your local code agent powered by a local LLM:
Conclusion
It was a bit long, but it was worth explaining everything. We now have a secure development environment inside an sbx sandbox with a Web IDE and docker-agent pre-installed, ready to use for developing your projects with the help of a local LLM.
If you want information about the sandboxes “running” on your machine, just type sbx in a terminal to get the sandbox dashboard. You can also use the sbx ls command for a more concise list of sandboxes. And of course, sbx help for the full list of available commands.
In a future article, I’ll explain how to get the most out of the Jan Code model using docker-agent and of course, we’ll use this newly created environment. Stay tuned! 🤓