Building a form with Pablo
In the previous article I introduced Pablo and went through the traditional Hello World. Today we’re going a bit further and building something “useful”: a form with several fields, two buttons, and a save to a text file.
It’s a simple example, but it covers the essentials: structuring a layout with multiple components, reading field values, and triggering actions on button clicks.
What we’re building
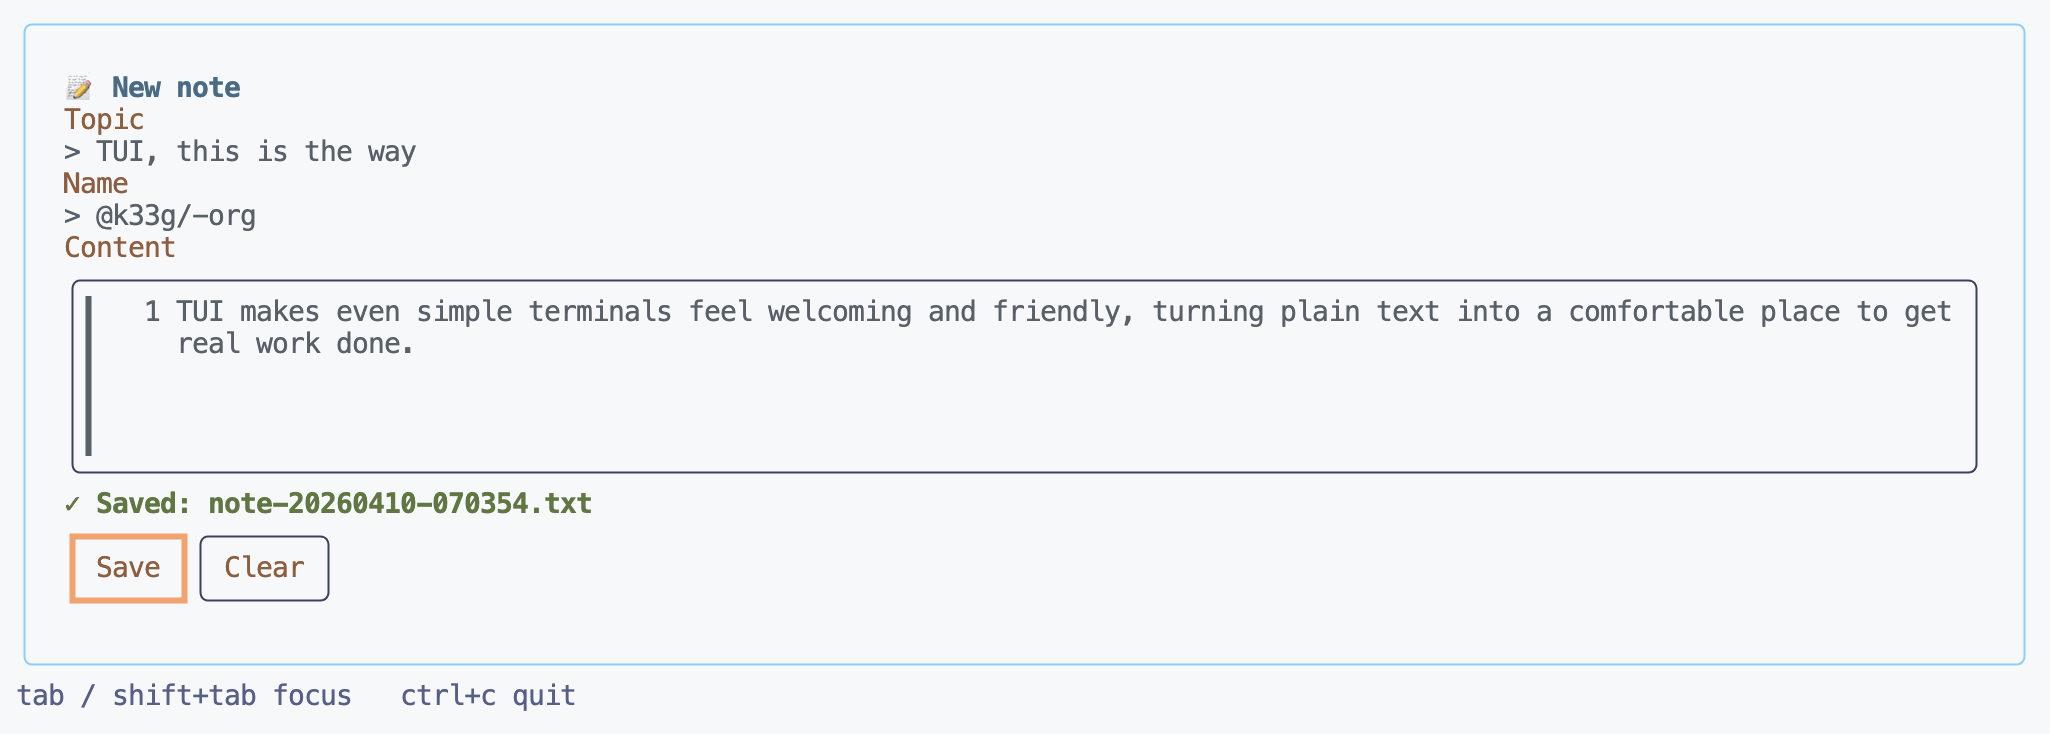
A note form with three fields:
- Topic — the subject (a single-line
<input>) - Name — the author’s name (a single-line
<input>) - Content — the body (a multi-line
<editbox>)
And two buttons:
- Save — writes everything to a timestamped
.txtfile - Clear — resets all fields
Set up your new project:
go mod init form
go get codeberg.org/ui-disentangle/pablo@v0.0.6
The layout structure
With Pablo, the first thing to do is describe your interface in a layout constant. You use an HTML-like syntax, and Pablo takes care of all the complicated parts.
Here’s how I start: the <screen> root that fills the whole terminal, then a <box> with a bit of padding to give things room to breathe:
<screen>
  <box style="padding: 0 1">
    ...
  </box>
</screen>
Inside that first box, I place a second <box> with a rounded border and some padding. That’s the one that holds the whole form. The padding: 1 2 adds a blank line at the top and bottom, and two spaces on each side:
<box style="border: rounded; padding: 1 2">
  ...
</box>
Now let’s add a title with the <text> component.
The title
Keeping it simple: a <text> with bold: true and a colour.
<text style="bold: true; color: #7DCFFF">📝 New note</text>
The topic and name fields
For each field, I use a <text> as a label, followed by an <input>. The <text> before the field doesn’t need an id since we’re not going to modify it dynamically — it’s just there for display.
<text style="color: #FF9E64">Topic</text>
<input id="topic" placeholder="note topic..." style="width: 50" />

<text style="color: #FF9E64">Name</text>
<input id="name" placeholder="your name..." style="width: 50" />
The width: 50 sets the total field width to 50 columns. We give each <input> an id because we’ll need it to read their values at save time.
The content field
For multi-line content, we use <editbox>. The difference from <input> is that it accepts multiple lines. Here I just set the height to 5 lines — the width will adapt automatically to the available space.
<text style="color: #FF9E64">Content</text>
<editbox id="content" placeholder="note content..." style="height: 5" />
The status text
I reserve a line to display the result of actions: success, error, empty message:
<text id="status" style="color: #9ECE6A"> </text>
The buttons
The buttons go inside a <box direction="horizontal"> to line them up side by side.
<box direction="horizontal">
  <button id="btn-save">Save</button>
  <button id="btn-clear">Clear</button>
</box>
The help text
Outside the form box, a discreet line reminds the user of keyboard shortcuts.
<text style="color: #565F89">tab / shift+tab focus ctrl+c quit</text>
The full layout
<screen>
  <box style="padding: 0 1">

    <box style="border: rounded; padding: 1 2">

      <text style="bold: true; color: #7DCFFF">📝 New note</text>

      <text style="color: #FF9E64">Topic</text>
      <input id="topic" placeholder="note topic..." style="width: 50" />

      <text style="color: #FF9E64">Name</text>
      <input id="name" placeholder="your name..." style="width: 50" />

      <text style="color: #FF9E64">Content</text>
      <editbox id="content" placeholder="note content..." style="height: 5" />

      <text id="status" style="color: #9ECE6A"> </text>

      <box direction="horizontal">
        <button id="btn-save">Save</button>
        <button id="btn-clear">Clear</button>
      </box>

    </box>

    <text style="color: #565F89">tab / shift+tab focus   ctrl+c quit</text>
  </box>
</screen>
Events
The layout is the structure. Events are the behaviour. In Pablo, you wire functions to events with app.On("component:event", func).
The Save button
When you click Save (or press enter while it has focus), the btn-save:click event is emitted. To read a field’s value, you use app.Component("id").GetPropString("value", "").
app.On("btn-save:click", func(e pablo.Event) {
    topic := strings.TrimSpace(app.Component("topic").GetPropString("value", ""))
    name := strings.TrimSpace(app.Component("name").GetPropString("value", ""))
    content := strings.TrimSpace(app.Component("content").GetPropString("value", ""))

    if topic == "" && name == "" && content == "" {
        app.Component("status").
            SetProp("value", "⚠ Nothing to save.").
            SetProp("style", "color: #E06C75")
        return
    }

    filename := fmt.Sprintf("note-%s.txt", time.Now().Format("20060102-150405"))

    var sb strings.Builder
    fmt.Fprintf(&sb, "Topic   : %s\n", topic)
    fmt.Fprintf(&sb, "Name    : %s\n", name)
    fmt.Fprintf(&sb, "Date    : %s\n", time.Now().Format("2006-01-02 15:04:05"))
    fmt.Fprintf(&sb, "\n%s\n", content)

    if err := os.WriteFile(filename, []byte(sb.String()), 0644); err != nil {
        app.Component("status").
            SetProp("value", "✗ Error: "+err.Error()).
            SetProp("style", "color: #E06C75")
        return
    }

    app.Component("status").
        SetProp("value", "✓ Saved: "+filename).
        SetProp("style", "bold: true; color: #9ECE6A")
})
A few things worth noting:
strings.TrimSpacecleans up any stray whitespace before checking whether the field is empty.- The filename is generated with
time.Now().Format("20060102-150405")— Go’s reference time (2006-01-02 15:04:05) acts as a format mask, which is one of the language’s quirks. - The status text changes both its value and its style depending on the outcome — green for success, red for error.
The Clear button
The Clear button resets all three fields. You just set the value prop to "" on each component. At the end, focus moves back to the first field with SetFocus().
app.On("btn-clear:click", func(e pablo.Event) {
    app.Component("topic").SetProp("value", "")
    app.Component("name").SetProp("value", "")
    app.Component("content").SetProp("value", "")
    app.Component("status").
        SetProp("value", " ").
        SetProp("style", "color: #9ECE6A")
    app.Component("topic").SetFocus()
})
Full source
package main

import (
	"errors"
	"fmt"
	"os"
	"strings"
	"time"

	tea "github.com/charmbracelet/bubbletea"

	"codeberg.org/ui-disentangle/pablo"
)

const layout = `
<screen>
  <box style="padding: 0 1">

    <box style="border: rounded; padding: 1 2">

      <text style="bold: true; color: #7DCFFF">📝 New note</text>

      <text style="color: #FF9E64">Topic</text>
      <input id="topic" placeholder="note topic..." style="width: 50" />

      <text style="color: #FF9E64">Name</text>
      <input id="name" placeholder="your name..." style="width: 50" />

      <text style="color: #FF9E64">Content</text>
      <editbox id="content" placeholder="note content..." style="height: 5" />

      <text id="status" style="color: #9ECE6A"> </text>

      <box direction="horizontal">
        <button id="btn-save">Save</button>
        <button id="btn-clear">Clear</button>
      </box>

    </box>

    <text style="color: #565F89">tab / shift+tab focus   ctrl+c quit</text>
  </box>
</screen>`

func main() {
	app := pablo.New()

	if err := app.Load(layout, nil); err != nil {
		fmt.Fprintln(os.Stderr, "load error:", err)
		os.Exit(1)
	}

	app.On("btn-save:click", func(e pablo.Event) {
		topic := strings.TrimSpace(app.Component("topic").GetPropString("value", ""))
		name := strings.TrimSpace(app.Component("name").GetPropString("value", ""))
		content := strings.TrimSpace(app.Component("content").GetPropString("value", ""))

		if topic == "" && name == "" && content == "" {
			app.Component("status").
				SetProp("value", "⚠ Nothing to save.").
				SetProp("style", "color: #E06C75")
			return
		}

		filename := fmt.Sprintf("note-%s.txt", time.Now().Format("20060102-150405"))

		var sb strings.Builder
		fmt.Fprintf(&sb, "Topic   : %s\n", topic)
		fmt.Fprintf(&sb, "Name    : %s\n", name)
		fmt.Fprintf(&sb, "Date    : %s\n", time.Now().Format("2006-01-02 15:04:05"))
		fmt.Fprintf(&sb, "\n%s\n", content)

		if err := os.WriteFile(filename, []byte(sb.String()), 0644); err != nil {
			app.Component("status").
				SetProp("value", "✗ Error: "+err.Error()).
				SetProp("style", "color: #E06C75")
			return
		}

		app.Component("status").
			SetProp("value", "✓ Saved: "+filename).
			SetProp("style", "bold: true; color: #9ECE6A")
	})

	app.On("btn-clear:click", func(e pablo.Event) {
		app.Component("topic").SetProp("value", "")
		app.Component("name").SetProp("value", "")
		app.Component("content").SetProp("value", "")
		app.Component("status").
			SetProp("value", " ").
			SetProp("style", "color: #9ECE6A")
		app.Component("topic").SetFocus()
	})

	if err := app.Run(); err != nil && !errors.Is(err, tea.ErrInterrupted) {
		fmt.Fprintln(os.Stderr, err)
		os.Exit(1)
	}
}
Running the application
go run main.go
You navigate between fields with tab and shift+tab. Focus cycles automatically in order: topic → name → content → Save → Clear, then back to the start. No configuration needed — Pablo handles that on its own.
After filling in the fields and clicking Save, a note-YYYYMMDD-HHMMSS.txt file appears in the current directory with the formatted content:
Topic   : TUI with Pablo
Name    : k33g
Date    : 2026-04-10 14:32:01

This is the note content.
You can write on multiple lines
using the editbox.
That’s it for this second example. It’s a basic form but it shows the essential patterns of Pablo: declarative layout, reading props, button events, and dynamic style changes for feedback.
The source code is available in the Pablo repository on Codeberg: https://codeberg.org/ui-disentangle/pablo/src/branch/main/blog-samples/01-form.