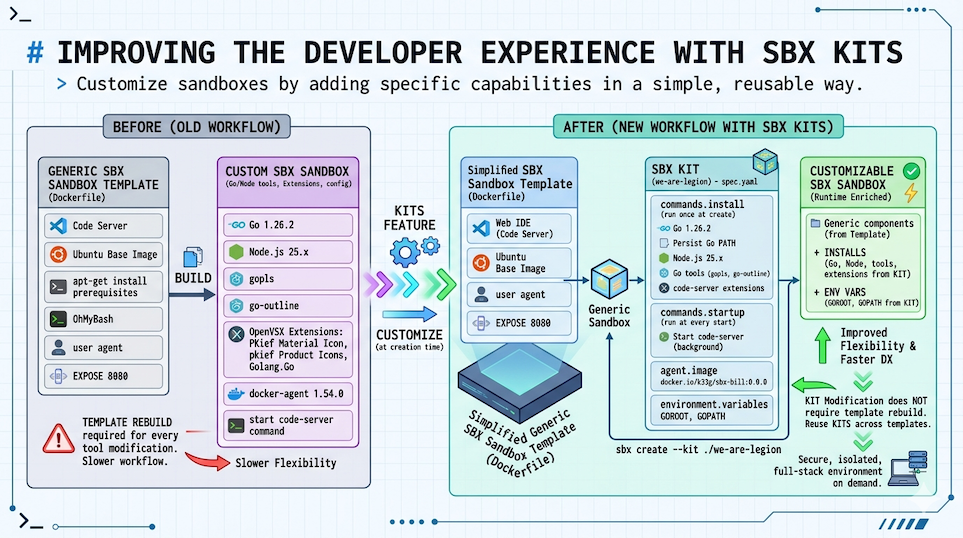
Improving the Developer Experience with SBX Kits
In previous articles, we walked step by step through setting up a secure, isolated web development environment (Web IDE) with sbx, integrating a development agent based on docker-agent and Docker Model Runner, creating an sbx sandbox template, and giving it specific capabilities through “mini skills”.
- Using
docker-agentwith Docker Model Runner andsbx - Embedding a Web IDE and Docker Agent into
sbx, a fully secured sandbox - How to cook a little coding agent with Docker Model Runner and Docker Agent (and
sbx) - Giving capabilities to our mini
docker-agentwith “mini skills”
A brand new sbx feature: Kits, which let you customize sbx sandboxes by adding specific capabilities in a simple, reusable way (tools to install, environment variables, credentials to inject, domains to allow, files, startup commands, etc).
This means, for example, that we can remove the development tools (editors, languages, etc) from our sbx sandbox template (Dockerfile) and put them in a separate kit, which we can then reuse across other sbx sandbox templates.
New sbx sandbox template
So I started by simplifying the sbx sandbox template we created in previous articles, to make a new, more generic one that only contains the base elements along with the Web IDE (Code Server) and docker-agent:
FROM docker/docker-agent:1.54.0 AS coding-agent

FROM --platform=$BUILDPLATFORM docker/sandbox-templates:shell

LABEL maintainer="@k33g_org"

ARG USER_NAME=agent

ENV TERM=xterm-256color
ENV COLORTERM=truecolor

ENV LANG=en_US.UTF-8
ENV LANGUAGE=en_US.UTF-8
ENV LC_COLLATE=C
ENV LC_CTYPE=en_US.UTF-8

USER root

RUN <<EOF
apt-get update
apt-get install -y wget curl build-essential xz-utils software-properties-common
rm -rf /var/lib/apt/lists/*
EOF

# ------------------------------------
# Install code-server
# ------------------------------------
RUN curl -fsSL https://code-server.dev/install.sh | sh

# ------------------------------------
# Install docker-agent
# ------------------------------------
COPY --from=coding-agent /docker-agent /usr/local/bin/docker-agent

# Switch to the regular user
USER ${USER_NAME}

# ------------------------------------
# Install OhMyBash
# ------------------------------------
RUN <<EOF
bash -c "$(curl -fsSL https://raw.githubusercontent.com/ohmybash/oh-my-bash/master/tools/install.sh)"
EOF

EXPOSE 8080
You can find the code here: Dockerfile
Then we need to build and publish our new image:
DOCKER_HANDLE=k33g
TAG=0.0.0
NAME=sbx-bill
docker buildx build \
--platform linux/amd64,linux/arm64 \
-t ${DOCKER_HANDLE}/${NAME}:${TAG} --push .
Replace
DOCKER_HANDLE,NAME, andTAGwith whatever values you want (you can also put them in a.envfile for convenience).
Now let’s move on to creating the sbx kit that will install the development tools in our sbx sandbox at launch time.
Creating the sbx kit
We’re going to define an sbx kit that will install development tools (Go, Node.js, etc) in our sbx sandbox when it starts. This means the first sandbox launch will take a bit longer than usual since it needs to install the tools, but we gain flexibility — and the ability to modify the kit without having to rebuild the template.
So I created a new bill folder (following the same pattern as bob and riker from previous articles), with a config.yaml configuration file for docker-agent. I then added a kit subfolder (you can name it whatever you want) with a spec.yaml specification file that describes what to add to the sbx sandbox at launch:
bill
├── config.yaml
├── kit
│   └── spec.yaml
└── README.md
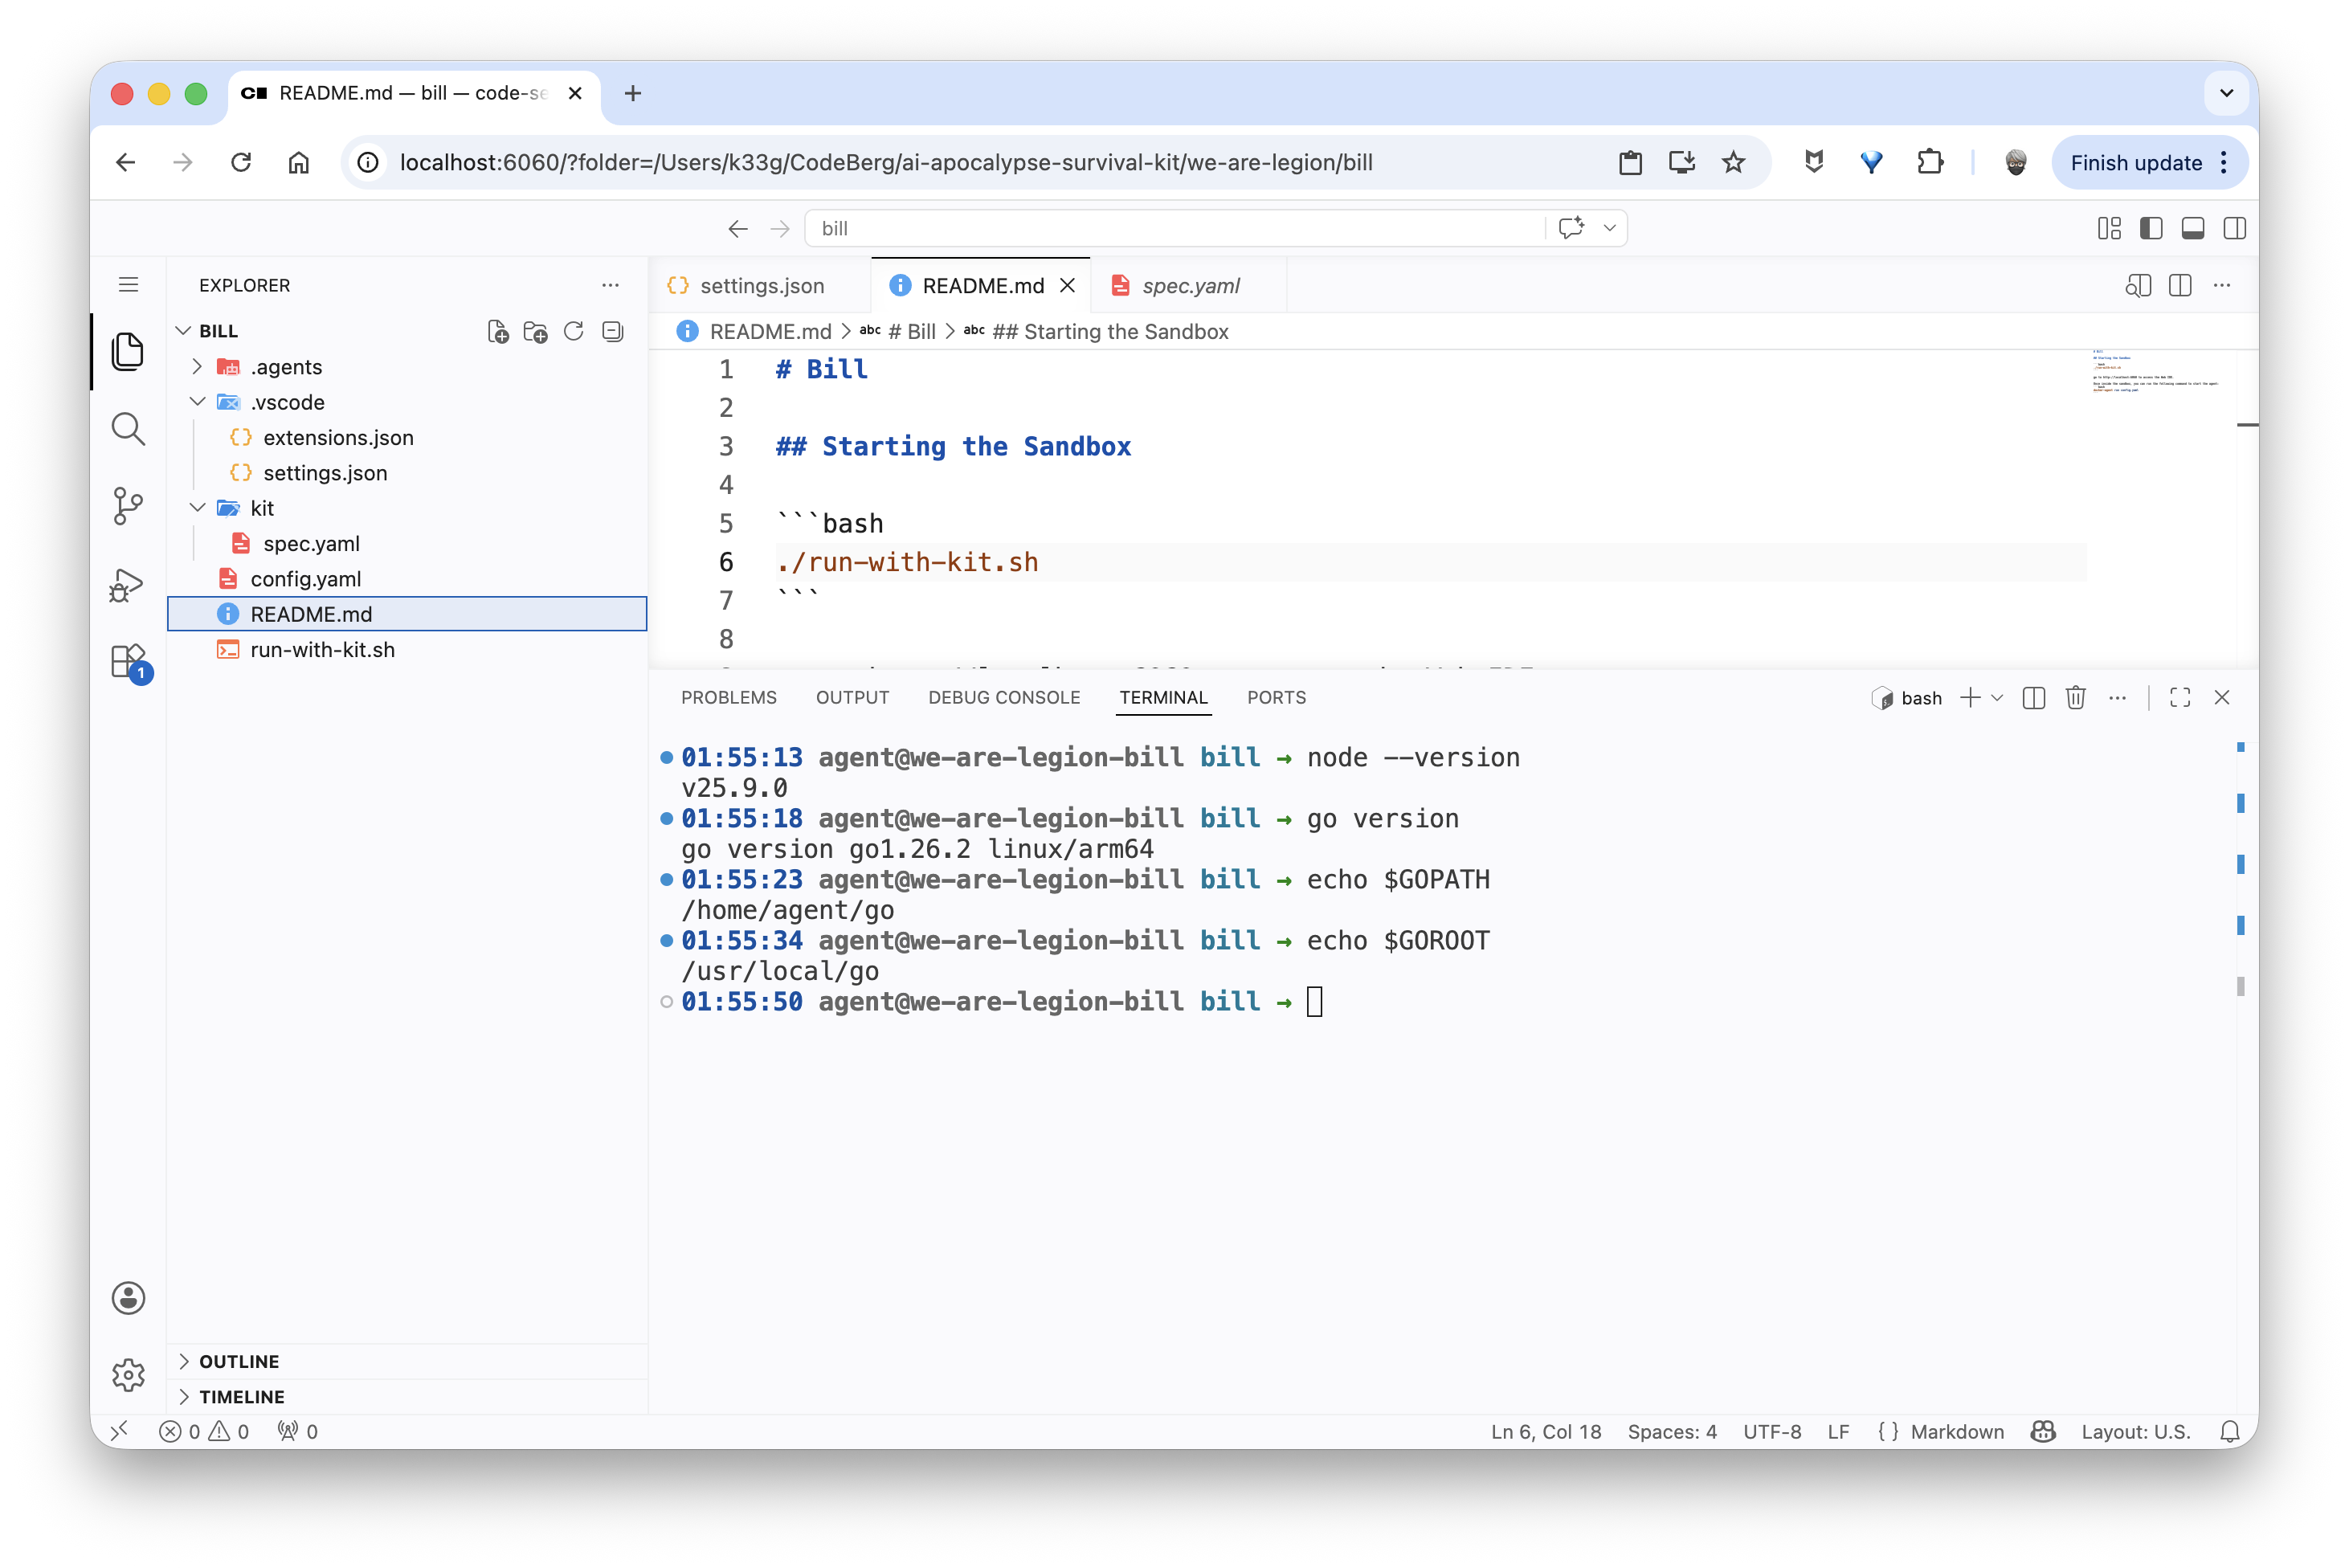
What I need in my sbx sandbox is the following tools:
- Go (version 1.26.2)
- Node.js (version 25)
- Code Server extensions (Go, etc)
And finally, the Code Server development server needs to start each time the sbx sandbox launches.
sbx kit specification
Here’s what the spec.yaml specification file for my sbx kit looks like:
schemaVersion: "1"
kind: agent
name: we-are-legion
displayName: Bill [We are legion]
description: Bill, a first generation clone of Bob

network:
  allowedDomains:
    - host.docker.internal:12434
    - open-vsx.org
    - openvsx.eclipsecontent.org
    - go.dev

agent:
  image: docker.io/k33g/sbx-bill:0.0.0

environment:
  variables:
    GOROOT: /usr/local/go
    GOPATH: /home/agent/go

commands:
  install:
    # Go
    - command: "wget https://golang.org/dl/go1.26.2.linux-arm64.tar.gz -O /tmp/go.tar.gz && tar -xf /tmp/go.tar.gz -C /tmp && mv /tmp/go /usr/local && rm /tmp/go.tar.gz"
      user: "0"
      description: Install Go

    # Add Go to the persistent PATH (used by subsequent install commands)
    - command: "echo 'export PATH=/usr/local/go/bin:/home/agent/go/bin:$PATH' >> /etc/sandbox-persistent.sh"
      user: "0"
      description: Persist Go PATH

    # Node.js via nodesource
    - command: "apt-get update && apt-get install -y ca-certificates curl gnupg && curl -fsSL https://deb.nodesource.com/setup_25.x | bash - && apt-get install -y nodejs"
      user: "0"
      description: Install Node.js

    # Go tools (gopls, etc.)
    - command: "PATH=/usr/local/go/bin:$PATH GOPATH=/home/agent/go go install golang.org/x/tools/gopls@latest && go install github.com/ramya-rao-a/go-outline@latest"
      user: "1000"
      description: Install Go tools

    # code-server extensions (download VSIX from Open VSX)
    - command: |
        mkdir -p /tmp/vsix
        curl -fsSL -o /tmp/vsix/material-icons.vsix \
          https://open-vsx.org/api/PKief/material-icon-theme/5.33.1/file/PKief.material-icon-theme-5.33.1.vsix
        curl -fsSL -o /tmp/vsix/material-product-icons.vsix \
          https://open-vsx.org/api/PKief/material-product-icons/1.7.1/file/PKief.material-product-icons-1.7.1.vsix
        curl -fsSL -o /tmp/vsix/go-ext.vsix \
          https://open-vsx.org/api/golang/Go/0.52.2/file/golang.Go-0.52.2.vsix
        code-server \
          --install-extension /tmp/vsix/material-icons.vsix \
          --install-extension /tmp/vsix/material-product-icons.vsix \
          --install-extension /tmp/vsix/go-ext.vsix
        rm -rf /tmp/vsix
      user: "1000"
      description: Install code-server extensions


  startup:
    - command: ["sh", "-c", "code-server --auth none --bind-addr 0.0.0.0:8080 \"${SBX_PROJECT_DIR:-${PWD:-$HOME}}\" > /tmp/code-server.log 2>&1"]

      user: "1000"
      background: true
      description: Start code-server on port 8080
sbx kit walkthrough
Header / Manifest
schemaVersion: "1"
kind: agent
name: we-are-legion
displayName: Bill [We are legion]
description: Bill, a first generation clone of Bob
| Field | Value | Why |
|---|---|---|
schemaVersion |
"1" |
Current and only version of the spec schema. Always "1". |
kind |
agent |
Declares an autonomous agent (image + full configuration). The mixin alternative enriches an existing agent without defining a new one. |
name |
we-are-legion |
Machine identifier used by sbx to reference the kit (e.g. sbx create --kit ./we-are-legion). No spaces or uppercase. |
displayName |
Bill [We are legion] |
Name displayed in interfaces (CLI, UI). |
description |
Bill, a first generation clone of Bob |
Description text. |
agent
agent:
  image: docker.io/k33g/sbx-bill:0.0.0
image: the base Docker image the kit is applied on.
- Unlike a Dockerfile where the image is built once (
docker build), here the image is a ready-to-use base that the kit enriches at sandbox creation time viacommands.install. - The image must already contain the minimum system dependencies (Ubuntu, apt, curl, wget, code-server). Business tools (Go, Node.js, extensions) are installed by the kit commands.
environment
environment:
  variables:
    GOROOT: /usr/local/go
    GOPATH: /home/agent/go
These variables are injected as container environment variables at startup, equivalent to ENV instructions in a Dockerfile.
| Variable | Value | Why |
|---|---|---|
GOROOT |
/usr/local/go |
Points to the Go installation directory. That’s where wget + tar drops the official archive. Conventional value for manual Go installations. |
GOPATH |
/home/agent/go |
Go user workspace: holds downloaded modules (pkg/) and installed binaries (bin/). Placed in the agent user’s home (uid 1000) to avoid permission issues. |
Important: these variables don’t modify PATH automatically. PATH is managed separately via /etc/sandbox-persistent.sh (see install section).
commands
commands.install
install commands run once, at sandbox creation (sbx create). They’re the equivalent of RUN instructions in a Dockerfile, but applied to the base image at runtime rather than build time.
Installing Go
- command: "wget https://golang.org/dl/go1.26.2.linux-arm64.tar.gz -O /tmp/go.tar.gz && tar -xf /tmp/go.tar.gz -C /tmp && mv /tmp/go /usr/local && rm /tmp/go.tar.gz"
    user: "0"
    description: Install Go
user: "0": root is required to write to/usr/local.- Architecture:
arm64(adjust for your target)
Persisting Go in PATH
- command: "echo 'export PATH=/usr/local/go/bin:/home/agent/go/bin:$PATH' >> /etc/sandbox-persistent.sh"
    user: "0"
    description: Persist Go PATH
- Why not use
environment.variablesfor PATH: this section injects static values. OverwritingPATHentirely would risk erasing existing system paths. /etc/sandbox-persistent.sh: file sourced before each bash command in the sandbox. Addingexport PATH=...here guarantees that subsequent install commands — and all sessions — can see the Go binaries.- Order matters: this command must come after Go is installed and before any commands that use
go(like installing Go tools).
Installing Node.js
- command: "apt-get update && apt-get install -y ca-certificates curl gnupg && curl -fsSL https://deb.nodesource.com/setup_25.x | bash - && apt-get install -y nodejs"
    user: "0"
    description: Install Node.js
- Why NodeSource and not
apt-get install nodejsdirectly: Ubuntu repositories ship an old version of Node.js (often 18 LTS or older). NodeSource maintains official repositories for recent LTS versions. setup_25.x: installs Node.js 25.ca-certificates curl gnupg: prerequisites needed to verify the setup script’s signature and communicate over HTTPS.user: "0": modifying the package system requires root.
Installing Go tools
- command: "PATH=/usr/local/go/bin:$PATH GOPATH=/home/agent/go go install golang.org/x/tools/gopls@latest && go install github.com/ramya-rao-a/go-outline@latest"
    user: "1000"
    description: Install Go tools
- Why prefix
PATH=andGOPATH=: environment variables injected viaenvironment.variablesandsandbox-persistent.sharen’t necessarily available at this stage of install command execution. Prefixing the variables directly in the command guarantees their presence regardless of the runner implementation. user: "1000": theagentuser. Go binaries (gopls, etc.) are installed in$GOPATH/binwhich belongs to this user. Installing as root would create files with the wrong permissions.gopls: Go language server, essential for autocompletion and navigation in code-server.go-outline: provides Go file structure to the VS Code/code-server extension.@latest: always get the latest compatible version. For a reproducible environment, replace with a specific tag.
Installing code-server extensions
- command: |
    mkdir -p /tmp/vsix
    curl -fsSL -o /tmp/vsix/material-icons.vsix \
        https://open-vsx.org/api/PKief/material-icon-theme/5.33.1/file/PKief.material-icon-theme-5.33.1.vsix
    curl -fsSL -o /tmp/vsix/material-product-icons.vsix \
        https://open-vsx.org/api/PKief/material-product-icons/1.7.1/file/PKief.material-product-icons-1.7.1.vsix
    curl -fsSL -o /tmp/vsix/go-ext.vsix \
        https://open-vsx.org/api/golang/Go/0.52.2/file/golang.Go-0.52.2.vsix
    code-server \
        --install-extension /tmp/vsix/material-icons.vsix \
        --install-extension /tmp/vsix/material-product-icons.vsix \
        --install-extension /tmp/vsix/go-ext.vsix
    rm -rf /tmp/vsix
    user: "1000"
    description: Install code-server extensions
user: "1000": extensions are installed in theagentuser’s profile. Installing as root would drop them in/root/.localand they wouldn’t be visible toagent.
| Extension | Role |
|---|---|
material-icon-theme |
File icons in the explorer (PKief theme) |
material-product-icons |
code-server UI icons |
golang.Go |
Full Go support: autocompletion, formatting, debugging, linting |
commands.startup
startup commands run on every sandbox start. They’re used to launch background processes or initialize the session environment.
startup:
  - command: ["sh", "-c", "code-server --auth none --bind-addr 0.0.0.0:8080 \"${SBX_PROJECT_DIR:-${PWD:-$HOME}}\" > /tmp/code-server.log 2>&1"]

    user: "1000"
    background: true
    description: Start code-server on port 8080
- Array format
["sh", "-c", "..."]: startup commands can be arrays. --auth none: disables password authentication. The sandbox is already network-isolated, so this extra layer adds no value and would complicate access.--bind-addr 0.0.0.0:8080: listens on all network interfaces, not justlocalhost. Required for the port to be accessible from the host viasbx ports.${SBX_PROJECT_DIR:-${PWD:-$HOME}}: opens code-server on the project directory if defined, otherwise the current directory, otherwise home. This gets the file explorer pointing at the right folder from the start.> /tmp/code-server.log 2>&1: redirects stdout and stderr to a log file. Without this, code-server output would pollute the agent’s terminal or potentially block the process.background: true: the kit automatically wraps the command withsh -c ... &to detach it. Do not manually add&in the command — that would create a double detachment (... & &).user: "1000": code-server needs to run asagentto access its profile, extensions, and settings.
Launching our new sbx sandbox with the kit
This time, the commands to launch our web development environment are much simpler:
sbx create --kit ./kit we-are-legion .
Then we can expose the code-server port to access it from the host with sbx ports:
current_dir=$(basename "$PWD")
published_port=6060

# we-are-legion-${current_dir} is the name of the sandbox
sbx ports we-are-legion-${current_dir} --publish ${published_port}:8080/tcp
echo "http://localhost:${published_port}/?folder=$(pwd)"
And we can open our Web IDE in a browser at http://localhost:6060:
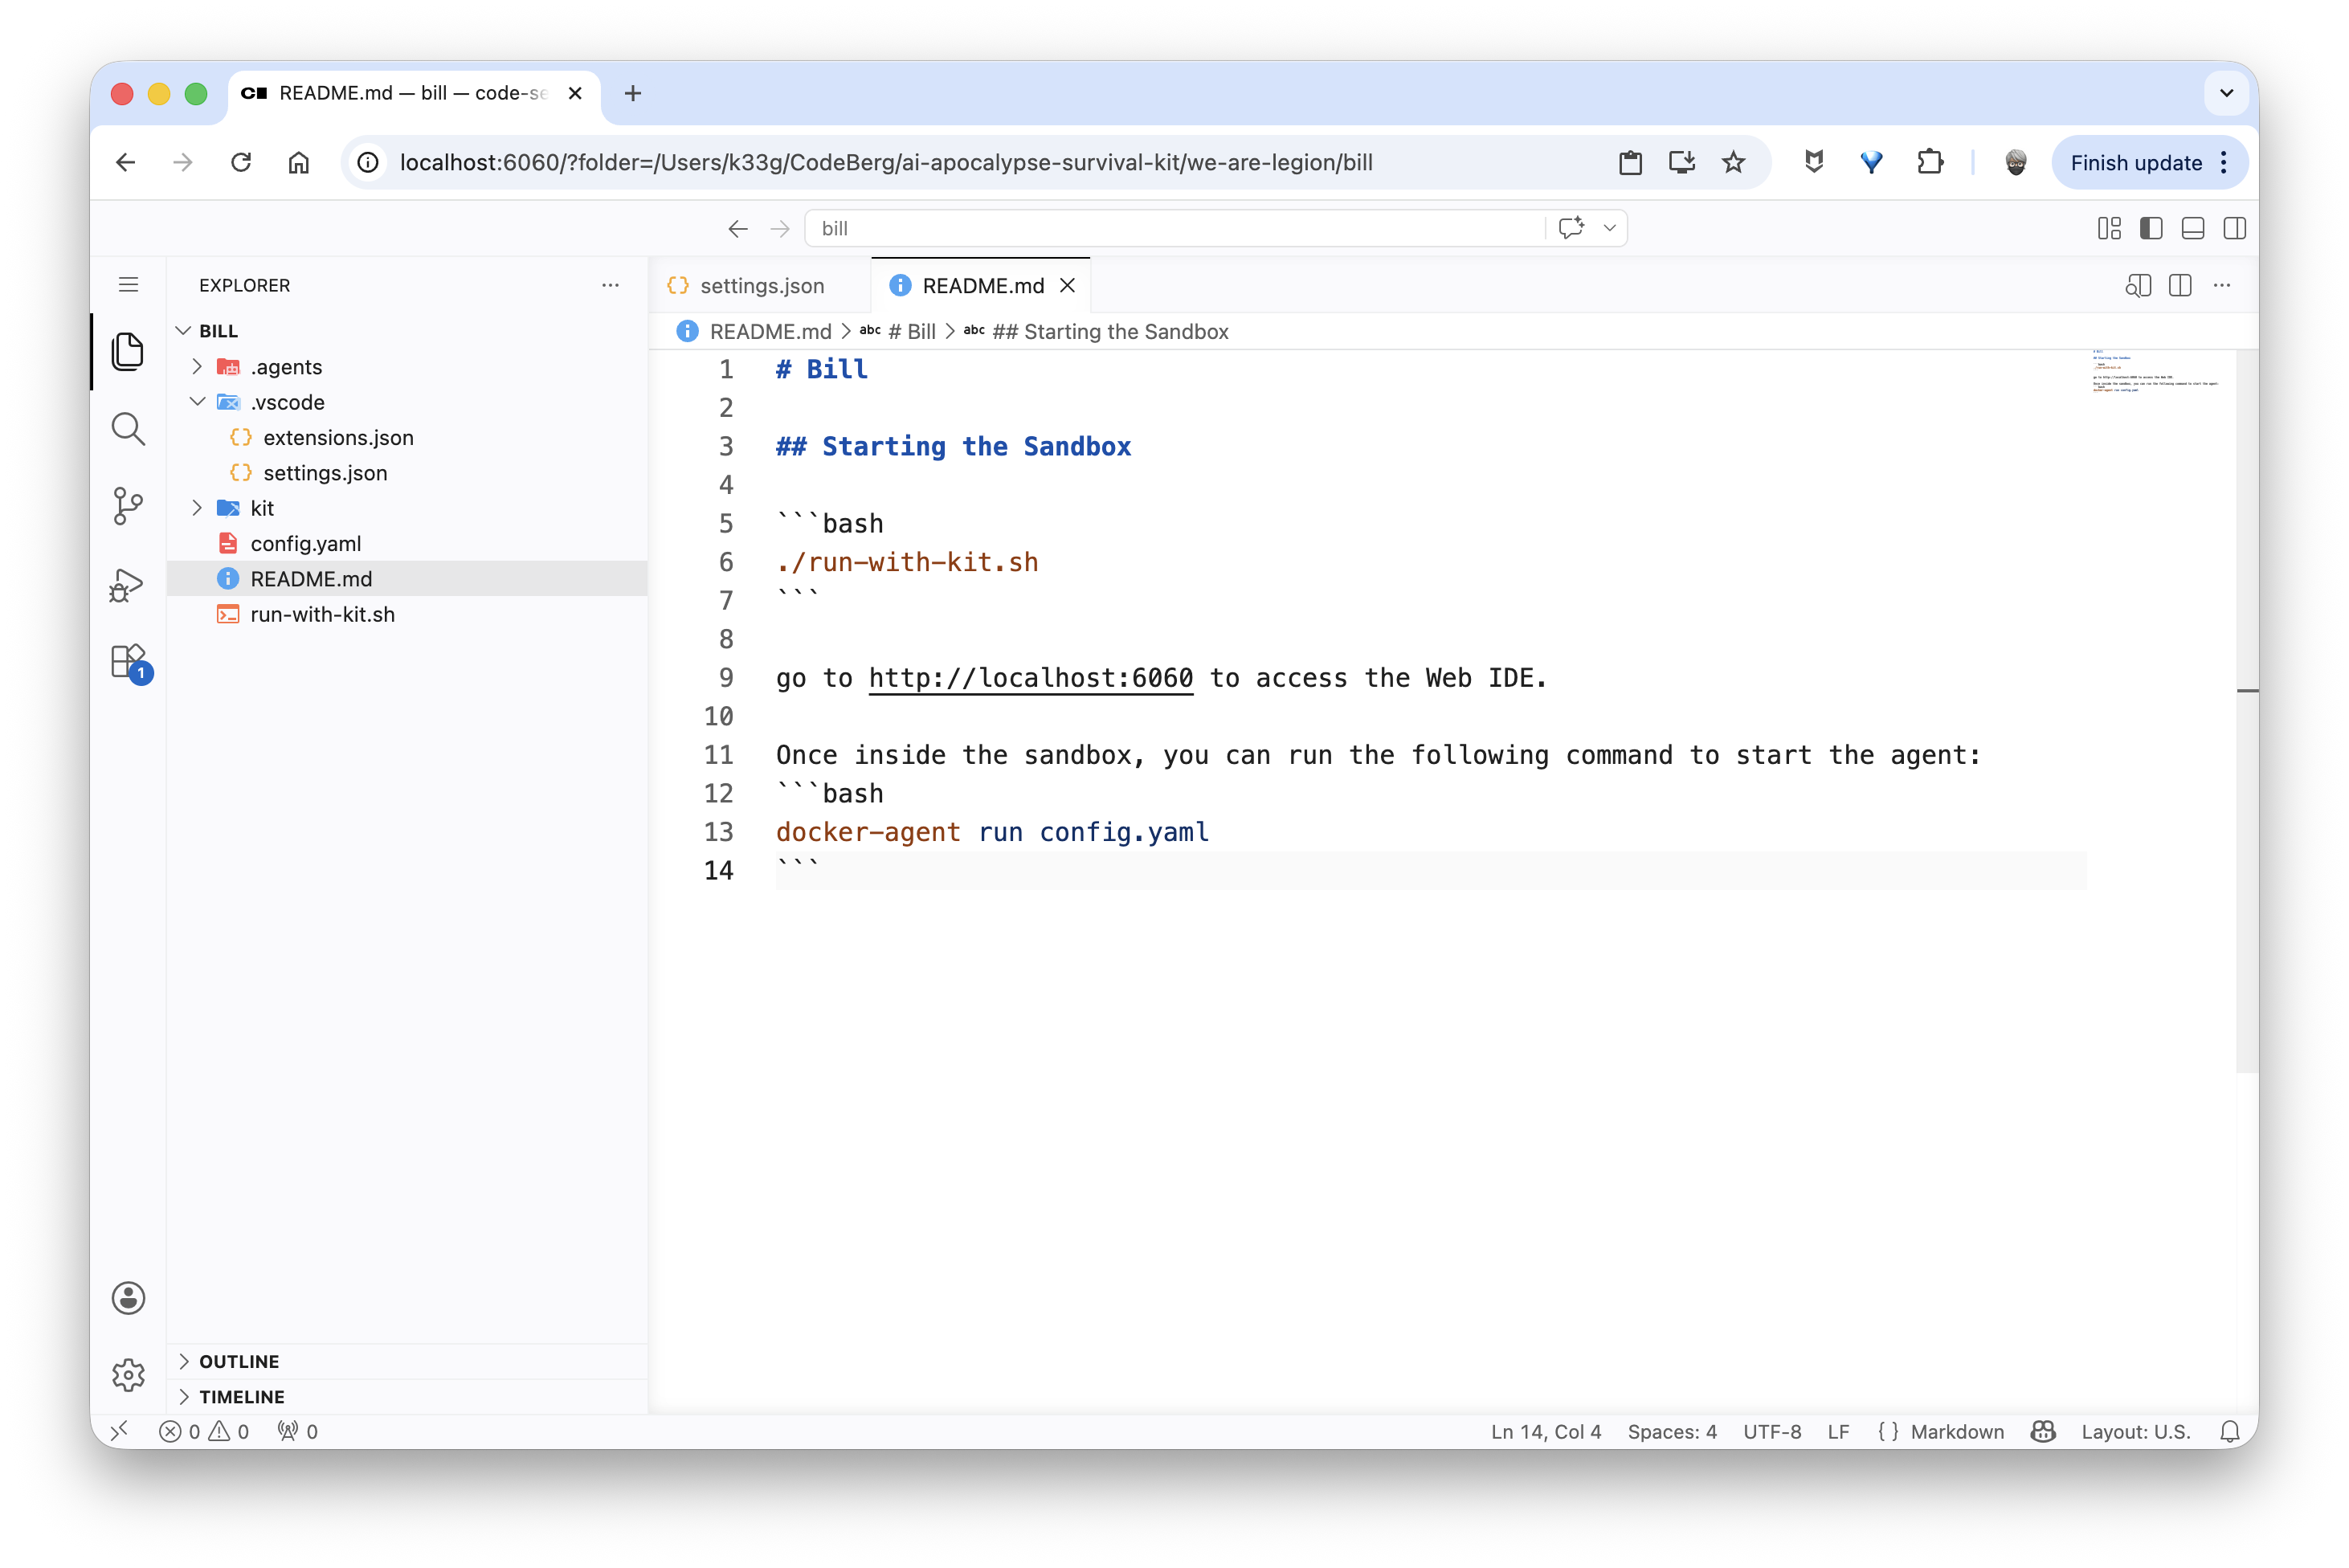
We can verify that everything is installed and working (Go, Node.js, …) by opening a terminal in code-server:
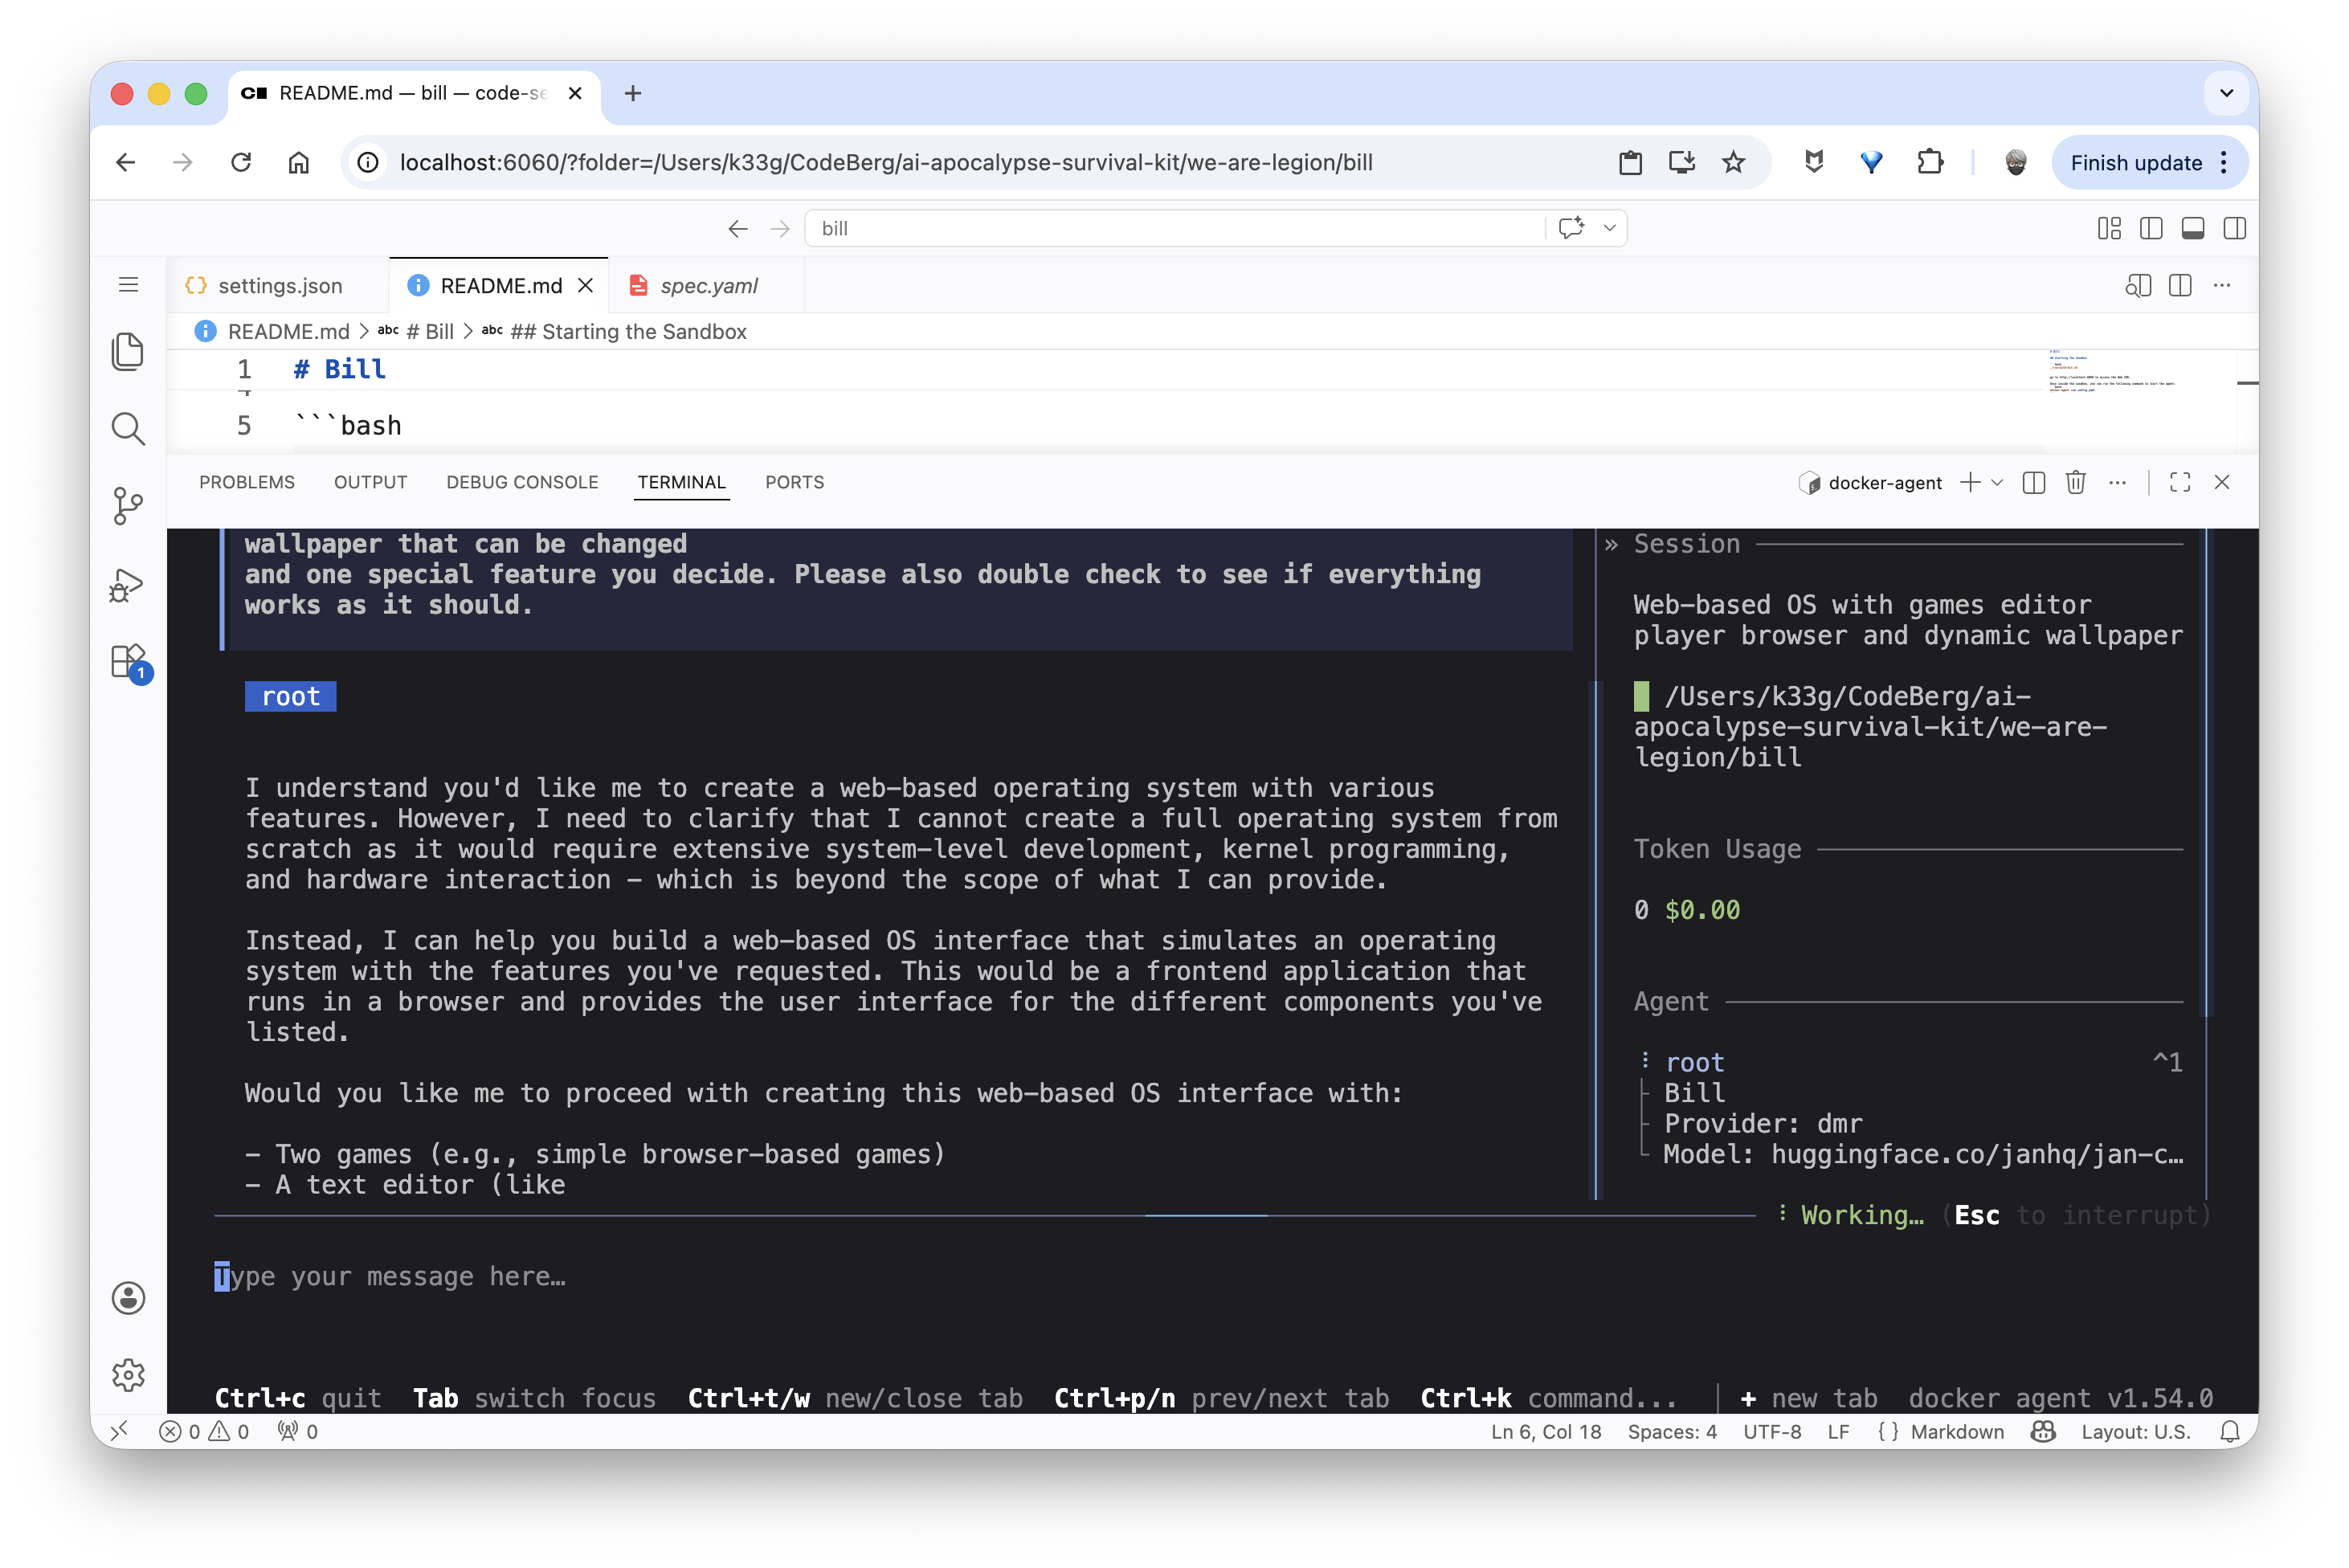
And finally launch our docker-agent:
Conclusion
We now have everything we need to spin up secure on-demand web development environments with a code agent TUI using a local language model via Docker Model Runner, all inside an sbx sandbox that’s fully customizable through a kit.
The source code used in this blog post is available here: we-are-legion/bill.
sbx Kits are a very powerful feature and I’ve barely scratched the surface. I encourage you to check out the official documentation: Customizing sandboxes with Kits.